Pages

Sunday 8 December 2013

Winner!

Thank you for all your kind comments on my advent card :)
And the winner is...

  1. Oh Pearl, it is just gorgeous. I adore this new stamp, so very pretty.

    Thank you for the chance & inspiration. 
    Merry Christmas
    Love Jane x

    Reply


    Congrats Jane! Please send me your address at pjrigonan@gmail.com so Magnolia can send your package :)

Monday 2 December 2013

Magnolia Advent Calendar - Day 2

It's one of the most wonderful time of the year - the opening of the Magnolia Advent Calendar :)
Thank you for visiting my blog! Today is my day :) Please don't forget to leave a comment on my blog to be eligible to win a surprise gift package from our friends in Magnolia Stamps!


I will be drawing a winner by the end of tomorrow, December 3 :)
Merry Christmas everybody :)

Sunday 3 November 2013

In The Snow Heart Tilda

Hi everybody!

I hope you guys have all recovered from the candy you have scored last halloween :) Traditionally on the first of November, we go to the cemetery to pay respects to our dearly departed. That was something I have missed doing for five years since I was working in Singapore so I'm glad I was able to do that this year. While it is also a national holiday from 31 Oct til 01 Nov, I did have to go to work and battle the traffic :(

My work schedule yet changed but the good thing about it is that I am now able to give time to crafting and that makes me so happy :) While doing my projects for the next Magnolia Ink, I am also finding time to make some Christmas cards :) So here's a card I would like to share with all of you :) I finished it today..


In The Snow Heart Tilda
Materials: Cardstock: American Crafts; Patterned Papers: Carta Bella & Echo Park; Chipboard: Maya Road; Rhinestones: Prima; Stickles, Distress Ink & Glitter, Liquid Pearls; flowers: iamroses; misc pistils, pearls, lace, bells
Stamping: In The Snow Heart Tilda from Winter Wonderland; Memento Ink; Xpress It Blending Paper; Copic Markers; Derwent Coloursoft pencils
Tools: dooHickey dies


This is my second attempt on no lines coloring. I think it turned out okay, it is a bit hard than the regular black ink but I had a lot of fun doing it :) I used Desert Sand Memento Ink and did a lot of highlighting using colored pencils.


I stacked the die cuts with chipboard snowflakes (which I had in my supplies for a very long time)..


Thanks for dropping by :) 
'Til next time :)

Sunday 27 October 2013

60 days before Christmas :)


Hello guys!

I am so happy to receive the new stamp club this week and I couldn't wait to ink all the gorgeous stamps :) I couldn't decide which to color first.. haha.. Love them all..

So here's the first card I made from the Winter Wonderland collection.. Hope you guys like it :)


Show the Way Tilda
Materials: Cardstock: American Crafts, Basic Grey; Patterned Papers: Magnolia; doily; daisy: iamroses; misc flowers, pistils, mistletoe, ceramic mushrooms, charms, bells, twine, pearl strings, lace; corrugated board; cheesecloth, Distress Ink, Distress Glitter, Stickles
Stamping: Stamps: Show the Way Tilda, Show the Way Baby Rudolf, Merry Christmas Banner, A Joyful Christmas from Winter Wonderland collection; New York Post from With Love Collection; Xpress It Blending Card; Memento Ink; Copic Markers
Tools: dooHickeys & Memory Box dies


The mistletoes I did myself with the materials I had bought last week from one of my favorite notions shop. It's so fun to do :)


I'm sure Tilda was pointing to something like maybe where to have dinner, or a Christmas gift that she wants (I'm sure I would do the same.. lol) .. And how cute that little Rudolph is just following her :)


Thanks so much for dropping by :)
'Til next time!

Sunday 6 October 2013

.. now that was a looongg time ..

Hi everybody!

Yes I am still here, still alive and breathing :) Since I started working again my life turned upside down..  I come home from work totally feeling drained and tired, if ever I'm home all I wanted to do was sleep. I've neglected all the rest of the activities that I like to do - like going out with my friends, going to the mall, CRAFTING! I guess it just took a little while for me to get used to the grind - it's especially hard that my time gets changed in the beginning, but now that my schedule is fixed (albeit odd hours at 2am - 11pm) I'm now trying to cope up.

Last month, I was honored to be invited to be the guest card designer for the Filipino Scrapbookers . I'd like to share it with all of you..


Sea Shell Tilda
Materials: Cardstock: American Crafts and Basic Grey; Patterned Papers: Magnolia; Flowers: iamroses; twine, corrugated board, cheesecloth, charm, Distress Inks, Stampendous Frantage, Gesso, pearl strings
Stamping: Sea Shell Tilda from the Sea Breeze collection; Xpress It Blending Paper, Copic markers, Memento Ink
Tools: doohickey dies, Memory Box dies


Adorable, adorable stamps from the Sea Breeze collection :)


I wanted to get them all - as usual - but since I am stuck with managing my time, I may have to push back that back for just a little bit :)


Thanks you guys for stopping by :)

Thursday 13 June 2013

Tilda With Cross Necklace

TGIF!

Just came back from the doctor for some medical tests this morning :( I wasn't able to wait for the results coz I was so hungry .. lol .. It's not so serious though (I hope), it's just routine needed for my new job..

Last Monday I finally received my Magnolia package, yay :) I am so happy! So many gorgeous stuff to keep me busy for a while. I was able to finish a card last night using a really cute stamp from the Special Moments collection.


Tilda With Cross Necklace
Materials: Cardstock: American Crafts; Patterned Papers: Magnolia; Flowers: iamroses; tulle, gesso, sprays, stockinged bird, twine, charm, corrugated board, Distress Ink, Glossy Accent, Liquid Pearl, German Glass Glitter
Stamping: Tilda With Cross Necklace from Special Moments; Xpress It Blending Paper; Copic Markers; Memento Ink
Tools: dooHickey & Spellbinder Dies


The sun was up for a little while, then the storm clouds came.. I'm glad I was able to take a photo just in time. I've colored precious Tilda with Copics.


The new papers from this collection are really beautiful! I die cut the paper with the large Envelope flap and cut another from a white cardstock as a mat. For the Feather die, I covered it with german glass glitter (love this stuff).


The stockinged bird is something I bought from a famous marketplace here in Manila. They use it for bridal souvenirs, etc. It's cute and cheap here :)


Thank you for stopping by and have a great weekend :)


Saturday 8 June 2013

Tilda With Big Ice Cream


Hi everybody!

I made a very big faux pas today.. I greeted my brother a happy father's day today only to realize it ain't gonna happen til next week.. haha.. My brother tortured me that my age is finally catching up with me.. Well we had a good laugh anyway.. lol..

I cannot wait for my new stamps from the Special Moments collection to arrive this week :) They are just so awesome and I cannot wait to do a lot of coloring. It will keep me busy on my off hours since I am also starting work next week and I'm very excited for that as well (well, not as excited as receiving a package.. lol..).

In the meantime, here's a card I made using stamps from the With Love collection. Now, if I can eat as much sweets as Tilda and not gain a pound, I would :)


Tilda With Big Ice Cream
Materials: Cardstock: American Crafts; Patterned Papers: Magnolia; flowers: iamroses; doily, ribbon, pearl string, pistils, corrugated board, tulle, gesso, Distress Ink, Glossy Accents, Liquid Pearl, Stampendous Frantage
Stamping: Tilda With Big Ice Cream & Baked With Love from With Love collection; Xpress It Blending Paper; Copic Markers; Memento Ink
Tools: Magnolia dooHickey & Sizzix


I love coloring masked images :) In this card it seems like Tilda is sneaking in for more sweets... Don't  you just love it when your stamps tell a story like that?


Love, love the Feather dooHickey dies! And it's just so awesome that it comes in 2 sizes :) I layered flowers on the bottom of the die and cut some tulle and placed them underneath just to give it some softness.


I used Frantage on the butterfly dies and layered them up to look like they are flying. My fellow DT member Debbie Dolphin has made absolutely beautiful cards using Frantage. I am in love with the Magnolia Design papers, very romantic, very subtle, incredibly beautiful! To soften it up I applied a little bit of gesso on the papers.


Thank you so much for stopping by and have a great week ahead :)

Wednesday 29 May 2013

Little Cute Tilda

Hi everybody!

I know it has been a while since my last post and the only reason for that was because I was busy finishing up several projects for the next Magnolia Ink issue. This issue is going to be so fabulous as always but for me this is so special :) I will keep it tight first but I am so sure that all of you will want to get a copy of it once it's out.

But before that, the latest issue of Magnolia Ink is out so grab yourselves a copy :)


Sea Breeze, Magnolia Ink Issue No. 3

And with the new magazine comes the newest Magnolia collection and they are just fabulous! I want each of those stamps in my desk :)


The new stamps, paper and dooHickeys are now available for pre order.

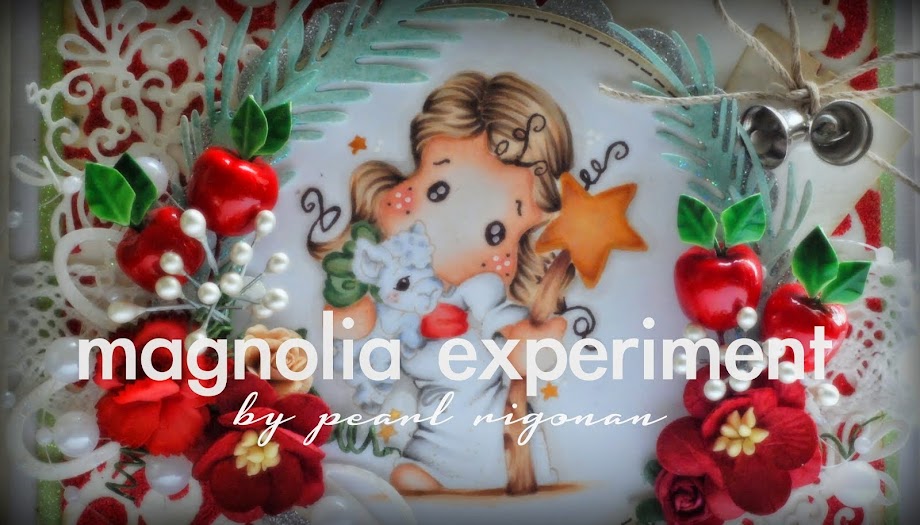
In the meantime, I would like to share a tag I whipped out last night. Don't you just love those sitting Tilda images? They are so versatile 'coz you can arrange it so that she is sitting in a lot of accessories that you have like stamps and die cuts. On this tag, I made Tilda sit on a window die cut.


Little Cute Tilda
Materials: Tag: Avery; Cardstock: American Crafts & Basic Grey; Patterned Papers: Magnolia; Flowers & Pistils: iamroses; fabric leaves, doily, stockinged bird, pearl string, Distress Ink, Stampendous Frantage, Liquid Pearl, Stickles
Stamping: Little Cute Tilda from Once Upon A Time 2013 & You are Special Text from Magnolia Stamps, Copic Markers, Memento Ink, Xpress It Blending Paper
Tools: dooHickey & Memory Box dies


Fabulous Magnolia Ink Papers - I can't get enough of them :)


This gothic window die is from Memory Box. I covered the die cut with Frantage to make it more vintage.


I colored Tilda using Copics. I used E70-77 for her hair, BG70-78 for her gown, YR21-24 & RV10-17 for her crown. I used a black pencil to highlight some points in the image.


Thanks for dropping by and see you guys again soon :)

Saturday 4 May 2013

Sitting Tilda With Butterfly


Saturday came so fast didn't it? My week wasn't so eventful.. My nephews have finally convinced me to take a dip in the pool but for the first hour I soaked in the kiddie pool which was so shallow I had to sit at the bottom to soak my whole body .. lol .. After that I convinced them to put on their floaters so that auntie can swim in the adult pool.. It puts a smile on my face to remember how silly I looked while I was in the kiddie pool less than 3 ft high with kids.. I felt like a whale :)

I did make a step card. I got this shape from the Silhouette Store last week when they had a sale of their downloadables. Love this shape! I also paired it up with the new dooHickeys from Magnolia.


Tilda With Butterfly
Materials: Cardstock: American Crafts & Bazzill; Patterned Papers: Basic Grey; Flowers: iamroses; doily, pearl strings, pistils, twine, lace, ribbon, charm, Distress Ink, Liquid Pearl
Stamping: Tilda With Butterfly from Once Upon A Time 2013; Xpress it Blending Card; Copic Markers; Memento Ink
Tools: dooHickeys (Envelope Edgers and Lace Coasters) 


I usually leave the insides of my card blank unless I get a request to embellish the insides as well.


This image is just too cute :)

And these are the Copic colors I used:


Thanks for dropping by and I hope you guys have a great weekend :)

Monday 29 April 2013

Tilda In Cottondress


What?!? It's Monday again? Time seems to be moving too quickly and now we're at the end of April. For us here in the Philippines, there's one month left for summer and by June it's school time once again.

Summer is still scorching and all I want to do is soak on the tub and drink orange soda! lol.. But alas, I cannot do that. So I just do the next best thing and that is to do more coloring. I am so in love with this collection that I have somehow colored almost all the stamps that I have. The next thing is putting them in projects mostly cards and maybe some tags.

Here's Tilda in Cottondress or as we fashionistas may call it - a maxi dress :)


Tilda in Cottondress
Materials: Cardstock: American Crafts; Patterned Papers: Magnolia and Basic Grey; Rhinestones: Prima; Flowers: Maya Road, iamroses; lace, pompoms, twine, pistils and sprays, pearl string, fabric calla lillies, Stickles, Distress Inks, corrugated board, gesso
Stamping: Tilda in Cottondress from Once Upon a Time 2013; Xpress It Blending Card; Memento Ink;  Copic Markers
Tools: Envelope Edge, Events Flags, Peacock Feathers and Sprawling Ferns from dooHickey


I didn't have any training in Copic coloring. All I needed to know I can find in the internet :) and of course lots of practice (which is the best part of all in my opinion). I wanted an off white dress for Tilda so I colored her dress in C's and covered it in B0000 and it gave a bluish hue which is really nice. I did the same for another Tilda stamp but I covered it on R0000 and it had a purplish hue which is also pretty :)


The Peacock Feather dies are really intricate and pretty. And do you see the Envelope Edgers? I layered 2 of the die cuts and inked the edges and made them peek out a bit for interest and layer.


The Events Flags are really versatile. In this card I used 2 different kinds of banners, use the same banners to make flags or mix and match them :)


And below are the colors I used to color Tilda..


Tilda in a Cottondress is a stamp included in the Spring Stampclub and guess what? Magnolia is having a sweet giveaway that will make you happy for the rest of the year! Visit the Magnolia Inspiration Blog for more details.

Thanks for dropping by and have a great week ahead :)


Sunday 21 April 2013

Princess Pea Tilda KISS*

It's Monday again my dear friends :) Any good plans for the week?

I am catching up on TV series and guess what? I am watching 'Once Upon A Time' - an American TV series about storybook characters. I'm actually hooked (no pun intended since Hook is included in the story)! It's really good. You may have an impression that this about romance and all the gooey stuff that comes along with it, but it's mystery packed with a lot of twists from what we know about our fairytale characters. I don't want to spoil it for you if you want to watch this series :)

I am still waiting if the Princess and the Pea character will show up.. But in the meantime, here's Princess Pea Tilda for you :)


Sweet Pea Tilda
Materials: Cardstock: Bazzill & American Crafts; Rhinestones: Prima; lace
Stamping: Princess Pea Tilda from Once Upon A Time 2013; Xpress It Blending Paper; Copic Markers; Memento Ink
Tools: dooHickey (Peacock Feathers, Events Flags, Envelope Edge); Silhouette (hello)


I was thinking of other ways to use the dooHickeys so I made a mask using Mask It Film and applied texture paste. It turned out really nice :) It adds interest instead of just adding color and the dooHickey is perfect because it's very detailed..


I made Tilda sit on the Events Flags dies :) The 'hello' sentiment is cut using the Silhouette.


* KISS (Keep It Sweet and Simple)


And above are the colors I used for Tilda :)

Thanks for dropping by :)


Thursday 18 April 2013

Black Knight Edwin and the new Once Upon A Time 2013 dooHickey Dies

Hi everybody!

I would like to share a card with all of you using the new dooHickey dies from Magnolia. I absolutely love the new dies! It's a great value with at least 2 dies per pack that you can mix and match with your existing dooHickeys. In this card I used 3 dies: Events Flags and Castle from Once Upon A Time 2013 collection and Grass Lace Edger from an earlier collection.


Black Knight Edwin
Materials: Cardstock: American Crafts, Hero Arts, Coredinations; Alpha Stickers: Making Memories; Distress Inks
Stamping: Black Knight Edwin from Once Upon A Time 2013; Xpress It Blending Paper; Memento Ink; Copic Markers
Tools: dooHickey dies (Castle, Events Flags, Grass Lace Edger)


I refrained from using flowers and all the usual knick knacks to showcase the beautiful die Castle. I added foam squares on some of the dies to add dimension.


Add sentiments using small alpha stickers on the flag. The Events Flags dooHickeys has 4 different flags, use the same shape flags or mix and match them :)


And isn't Edwin just looks dashing in his knight outfit? I adore this stamp so much - Edwin looks ready to roll and joust and his steed looks adorable :)

Thanks for dropping by and have a great weekend :)